

how to install adrenaline ps vita

Last updated: 07AUG2021 (see Changelog for details)
This tutorial will show you how to safely and permanently jailbreak/mod your device so that you can run RetroArch or other emulators, plus load backups of your PS Vita, PSP, and PS1 games.
This guide is intended for the PS Vita 1000 and PS Vita 2000 models. The PS TV setup is mostly the same, but there are some slight differences in the process; because I've never used a PS TV, I would recommend looking elsewhere for the jailbreak instructions. This tutorial is written for Windows users, but Mac users can also follow this guide. When the process deviates for Mac users, I have provided relevant instructions and adjustments.
Note that each of these tutorials are written in a specific order. For example, you will need VitaShell installed to run certain tools, and so those instructions are found above the other tutorials. Long story short: if you just jump into a specific section and it references things you don't understand (like VitaShell, AutoPlugin II, etc.), then scroll up a bit to find those particular instructions.
Table of Contents: Why mod a PS Vita? PS Vita 1000 vs PS Vita 2000 Buy an SD2Vita adapter *New* VitaDeploy method Connect via WiFi FTP (VitaShell) Set up AutoPlugin II Set up Adrenaline (PSP and PS1 emulator) Adrenaline Bubble Manager Install RetroArch Create RetroArch bubbles Install standalone emulators and ports Nintendo 64 emulation Overclocking the PS Vita Improve the PS Vita 2000 screen Old hacking method: Permanent mod guide (old method) Upgrade to 3.73 (or stay at 3.65) Set your File Explorer options Prepare for jailbreak Downgrade to firmware version 3.65 Jailbreak your PS Vita Restore PlayStation Store access Old SD2Vita method: SD2Vita Guide (YAMT method) How to migrate from Storage Manager plugin to YAMT SD2Vita Guide (Storage Manager method) Changelog 
Why mod a PS Vita?
There are many reasons to run a permanent mod/jailbreak on the PlayStation Vita. Here are some of my favorites:
- ADRENALINE. This app runs a PSP environment directly on your PS Vita. This allows you to load and play PSP and PS1 games with perfect native performance. Because the PS Vita screen has exactly 2x the amount of pixels as the PSP, it scales perfectly.
- PS VITA GAMES. It goes without saying, but you can play Vita games on a PS Vita. But with a modded device, you can run backups of your games, which means you don't have to constantly swap cartridges.
- SD2VITA. An SD2Vita adapter allows you to use a microSD card as storage for your permanently modded PS Vita. $30 for a 256GB storage solution? Count me in.
- RETROARCH (AND OTHER EMULATORS). The PS Vita has a good amount of emulators available, and while it's not the most powerful emulation machine for the money, you can still expect to play most classic retro games, plus a fair amount of Nintendo 64 games as well. Moreover, you can run emulators within Adrenaline, which features many optimized emulators, too.
- PLUGINS. There are hundreds of plugins available for the PS Vita, which will allow you to make any number of small (or large) tweaks to your device, such as adding a battery % indicator, remapping buttons, and so on.
- NATIVE PORTS. There are a good amount of native ports you can run on this device, including all three Grand Theft Auto III games, Max Payne, and more.
PS Vita 1000 vs PS Vita 2000
There are two models of PS Vita, each with its own unique characteristics. See the video above for a deep-dive comparison between the two models. In a nutshell: they both play the same games, the PS Vita 1000 has an OLED display, and the PS Vita 2000 is thinner and lighter.
There are some adjustments you can do to the PS Vita 2000 to improve its screen, which you can find here (requires jailbreaking first).
Buy an SD2Vita adapter
The single most important accessory you can buy for your PS Vita is the Funturbo SD2Vita card adapter. This will allow you to use a microSD card for storage on your device after it has been jailbroken. It's the best $6 you could ever spend. I've heard bad things about other SD2Vita adapters, so I would stick with the Funturbo brand — I have two and they have worked perfectly.
I think that a 128GB card should be the bare minimum size you buy, and I recommend getting something with 256GB. PS Vita, PSP, and PS1 games are all fairly large, so this will ensure you can load up lots of games. Here are the microSD cards I recommend:

128GB cards: SanDisk Extreme Samsung EVO Select Samsung Pro Endurance (more reliable but pricey) SanDisk Ultra 256GB cards: Samsung EVO Select SanDisk Ultra
*New* VitaDeploy method
VitaDeploy came out in early 2021 and improves the jailbreaking process significantly. It's an all-in-one solution for hacking the device as well as setting it up to work with a microSD card thanks to the SD2Vita adapter. This method is thoroughly documented in this guide, so be sure to check there if you run into any issues.
Before we get started:
- This hack assumes that you are starting with a brand new PS Vita that has been factory restored. Carrying over previous games or save games significantly complicates this process, and for support on moving existing catalogs over, I recommend consulting the VitaHacks community on Reddit or Discord.
- If you have a PS Vita 1000 model you will need an official Sony Memory Card inserted into the device, since the v1000 doesn't have built-in storage. Any size memory card will work fine, the smaller the better since those are cheaper.
- This method requires Windows, and currently the Mac version of FinalHE is not working properly. I recommend borrowing a friend's Windows machine or creating your own Windows virtual machine (which is very easy for all but the newest M1 Macs).
- Your PS Vita must be on firmwares 3.60, 3.65, 3.68 or 3.73 in order to run this hack. If it is on a different firmware, update it using the System Update tool found in the Settings app. This hack was performed and tested on a new PS Vita with firmware 3.73.
- Connect your PS Vita to your local WiFi, and I also recommend you log into the PSN Store at least once before starting this hack.
- If your Vita is already hacked, there is no reason to do this hack unless you want to have the official PS Vita bootup logo on your device or if you're just in the mood to start over from scratch. You can restore a hacked Vita by going to Settings > Format > Restore System, and then run a system update to bring it up to 3.73.
Okay, now let's get started:
Install Final h-encore2:
- Head over to soarqin's GitHub releases page and download the latest release of FinalHE. Unzip the file into its own folder.
- Go to SKGleba's GitHub releases page and download the latest release of VitaDeploy. Keep this file zipped, and place it inside the FinalHE folder.
- Inside the FinalHE folder, start the FinalHe.exe file. A window will pop up, select the "Trim h-encore to ~7MB" option, then open the side menu (it's a very small arrow) and select the VitaDeploy option under "Additional applications". Turn on your Vita and plug it into your PC via USB; navigate to the Content Manager app and select "Copy content > PC". FinalHE will detect your Vita.
- On your PC, in the Final h-encore window, click the "Let's GO!" button and wait until it finishes. On the Vita, navigate to "PC > PS Vita > Applications > PS Vita" and select both h-encore2 and VitaDeploy and then select "Copy".
- Back on your Vita's main menu, you should now see the h-encore2 and VitaDeploy apps. Tap the h-encore2 app to launch it (if it crashes, keep trying until it works). Once the app is open, all you have to do is exit the app.
PC connection troubleshooting
If you have problems connecting your Vita to the PC in order to run FinalHE, try the following steps:
– Install the Content Manager Assistant application. You don't need to actually run it, but the act of installing it will install drivers that can assist in the connection.
– If that doesn't work, try uninstalling the Content Manager Assistant and installing QCMA instead. QCMA uses a different set of drivers, which have been found to work on some Windows PCs.
Install custom 3.65 firmware:
- Open the Vita's Settings app, and open "HENkaku settings". Select "Enable Unsafe Hombrew" and make sure you are connected to the internet.
- Open VitaDeploy and navigate to "Install a different OS" > "Quick 3.65 install". The app will download and install v3.65 and downgrade via the modoru tool. It will ask you if you really want to do it — just press X to confirm. Once complete, the Vita will reboot.
- Head over to Settings > System Information to confirm that you are now on v3.65 with the enso permanent hack.
Set up the SD2Vita adapter
- Insert a microSD card into the SD2Vita adapter, then insert the adapter into your Vita's game card slot.
- Open VitaDeploy and navigate to Miscellaneous > Format a storage device. Select "Format target storage" and follow any prompts. Reboot the device.
- Open up your Settings app, then navigate to Devices > Storage Devices, and enable YAMT. Reboot the console.
- Open VitaDeploy > File Manager, and make sure that the "uma0" partition is visible. Navigate to the "ux0" partition and select all of the folders except "SceloTrash" (use the SQUARE button to select). Press the TRIANGLE button and select "Copy".
- Navigate to the "uma0" partition, press TRIANGLE to bring up the menu, and select "Paste".
- Return to the Settings app and navigate to Devices > Storage Devices. Set the following options:
ux0: SD2Vita uma0: Memory Card
Reboot the console, head to Settings > System Settings and the memory card size should now reflect the capacity of your microSD card.
Install core homebrew apps
- Open VitaDeploy > App Downloader, and install the following apps:
- VitaShell – a powerful file management system
- Vita Homebrew Browser – a handy tool to browse and download various apps and homebrew games
- Adrenaline – a PSP environment that allows you to play PSP and PS1 games with perfect performance (more info here)
- PKGj – you're going to have to Google this one to learn more, but it's pretty handy.
- vita-savemgr – allows you to dump and restore your save games.
- Custom Themes Manager – as the name implies, this allows you to manage custom themes.
- iTLS Enso – adds TSL v1.2 to the device, which fixes many plugin errors, adds more installer options, allows secure (https) internet access, and restores access to the PS Store.
- Registry Editor – this allows you to improve the color saturation on PS Vita 2000 models (more info here).
Connect via WiFi FTP (VitaShell)
The simplest way to access your device is through a USB cable running VitaShell (when in VitaShell, just press the SELECT button to start the connection). But if you want to access your device wirelessly, VitaShell has that option as well.
Start up VitaShell, then press START to bring up the main settings. Change the "SELECT button" option to "FTP", then press START to exit out of the main settings. Now, press SELECT. You should see a message with an FTP address, like this:
ftp://192.168.86.XX:1337
The "XX" in the address above will be unique to the IP address your Vita is currently using.
On your preferred FTP client (like WinSCP or FileZilla for Window), start a new FTP connection. For the address, type in 192.168.86.XX (with "XX" being whatever is displayed on your Vita), and change the port to "1337". Press the connect button on your client, and when it asks you for a username and password, don't type anything and just press OK instead.
You should now be connected, with access to all of your file system on the device (not just the SD card).

Set up AutoPlugin II
AutoPlugin II is a powerful tool that lets you install and uninstall plugins on your Vita. There are many plugins available, but there are two in particular we want to set up so that we can install and run homebrew on our device.
To get started, download the latest version of AutoPlugin2.vpk from this link. Connect the Vita to your PC via VitaShell, then press SELECT on the Vita to enter USB mode. Copy the AutoPlugin2.vpk file into the root "USB Drive" folder of your Vita On your Vita, select and install the AutoPlugin2.vpk file. Disconnect from USB mode, then go back to the home screen. You should now see the AutoPlugin II app there.
Open up AutoPlugin II, then go to Plugins for Vita > Install Plugins, and install one of the following plugins:
NoNpDrm by The OfficialFlow v1.2 (preferred) NoNpDrm Unofficial by LMAN v1.4
Once it has been installed, let's re-install it in a different path to ensure that they're fully loaded. Press the TRIANGLE button to change the custom install path from ur0:tai/ to ur0:tai/plugins/ instead. Reinstall the plugin again. This is a redundant step but will ensure that everything works smoothly.
Press START to exit AutoPlugin II, and the system will restart. You're now good to go to use apps like PKGj to recover and download your previously-purchased PS Vita, PSP, and PS1 games and DLC. The legality of PKGj is a little bit iffy, and so for that reason I won't be providing a tutorial on how to install and run that app, but the process is the same as it is for any other VPK.
Set up Adrenaline (PSP and PS1 emulator)
Adrenaline is a PSP emulator that basically boots into the original PSP environment. It's wonderful. This is also the best way to play PS1 games, and some emulators (like for NES, SNES, etc.) are also pretty good from within PSP.
If you haven't already installed Adrenaline while setting up VitaDeploy, download the latest version of Adrenaline.vpk from this link. Connect the Vita to your PC via VitaShell, then press SELECT on the Vita to enter USB mode. Copy the Adrenaline.vpk file into the root "USB Drive" folder of your Vita Disconnect from USB mode, then go back to the home screen. You should now see the Adrenaline app there.
Open up Adrenaline, and it will prompt you to complete the download and installation of the 6.61 Adrenaline firmware. Press the X button to confirm, and once the download is complete it will exit Adrenaline. If you get an error about missing 6.61 on your device, the easiest fix is to just download v6.61 directly and place it in the folder that is indicated on the error screen. Re-open the app, and it will prompt you to install the firmware we just downloaded. That's it, you should now be in the setup screen for a brand new PSP environment. Note that when opening Adrenaline, it will crash the first time. You can bypass this "double touch" by installing the "Adrenaline by TheOfficialFlow (Fix double touch)" plugin within AutoPlugin II.
The easiest way to add PSP and PS1 games to your device is through the PKGj app, but you can also manually add them. Note that the "pspemu" folder is hidden in Windows and Mac, so you must have hidden folders enabled in order to find it. This is where you add each file:
PSP: sdcard/pspemu/ISO/ PS1: sdcard/pspemu/PSP/GAME/(titleid)/EBOOT.PBP
For PSP, just place the .iso files in the folder listed above.
For PS1, the games must be in PBP format. You will need to organize the games by titleid within the folder above. I have found that the easiest place to find these titleids it through this website. If you cannot find the game you're looking for, here is a more comprehensive list of each titleid, but it will come up with LOTS of results and so it may be a challenge to pare it down to the appropriate game. Just search for your game to find the appropriate titleid.
Once you have the titleid, make a folder inside the GAME folder with that titleid as the name. Within the titleid folder, you will need the game, named EBOOT.PBP (upper case). So for example, in order to play Tony Hawk Pro Skater 2, you will use the following path:
sdcard/pspemu/PSP/GAME/SLUS01066/EBOOT.PBP
When scaling PS1 within Adrenaline, I recommend using these settings:
X: 1.225 Y: 1.265
For PS1, I also prefer to set Graphics Filtering to Advanced AA, and turn Smooth Graphics OFF. Also, go into the "Open Official Settings" section within the Adrenaline Main Menu, then select Others Settings > Other Settings > Bilinear Filtering > OFF.
For PSP, I like the lcd3x and sharp bilinear (no scanlines) filters.
You can also use this handy PSP Emulators Installer app to install emulators directly into your PS Vita's Adrenaline app. You would install this app just like any other vpk, and then run the installer script. This will install the following emulators to run on your PSP environment:
COELM PSP = Colecovision CPS1 = Capcom DaedalusX64 = Nintendo 64 (N64) Emuodd = Magnavox Odyssey Fuse = ZX Spectrum 48K LYNX = Atari Lynx Masterboy = Sega Master System MVS = Neo Geo Picodrive = Megadrive/Genesis PSP7800 = Atari 7800 PSPATARI = Atari 800,800XL,130XE PSPCAP32 = Amstrad CPC464 PSPHUGO = Pc-Engine/TurboGrafx-16 PSPINT = Intellivision PSPTHOM = Thompson TO7 PSPVE = Vectrex RACE = Neo Geo Pocket/Color s9xTYLcm_mod = Super Nintendo (SNES) SMSPSP = Sega Master System Vice = Commodore C64
Adding your ROMs varies by standalone emulator, but generally you will want to add them to the pspemu/PSP/GAME/(name of emulator) folder, inside a folder labelled as "ROMs" or something to that effect.
To enter the Adrenaline settings, hold down on the HOME button. To exit Adrenaline, double-click the HOME button to return to the PS Vita menu.
Adrenaline Bubble Manager
The Adrenaline Bubble Manager will allow you to place individual bubbles for your PSP and PS1 games onto your PS Vita home screen.
To get started, head over to this page and download the latest release of Adrenaline Bubble Manager VPK, and load it onto your device via VitaShell. Install the app via VitaShell, then open the app to complete the installation. It will prompt you to reset your device. Once rebooted, open Adrenaline one time, then close it, and then open Adrenaline Bubble Manager.
Inside Adrenaline Bubble Manager, you will see all of the PSP and PS1 games you have installed in Adrenaline. To select a game for bubbling, press the SQUARE button to select it. You can also press the L button to change the shape of the image to cover the whole bubble. Once you have all your desired games selected, press the CIRCLE button to begin the bubbling process. Alternatively, you can just press the TRIANGLE button to make bubbles for every game that doesn't have on already. At this point you will be prompted to confirm the name of each of your bubbles, and then the bubbles will be created.
There's a lot more you can do with Adrenaline Bubble Manager, like loading your own images. For more info, check out their wiki page.
Install RetroArch
RetroArch isn't the most powerful emulation solution for the PS Vita, but it's the only one that provides a unified gaming experience. To get started, download the latest nightly version of RetroArch VPK from this link. Additionally, download the latest nightly RetroArch data file from that same link. The VPK contains the actual app and all its cores, while the data file contains all of the assets (fonts, graphics, etc.).
Connect the Vita to your PC via VitaShell, then press SELECT on the Vita to enter USB mode. Copy the retroarch.vpk file into the root "USB Drive" folder of your Vita Next, unzip the RetroArch data file, and move the RetroArch data folder (named "retroarch") into the PS Vita's data folder. On your Vita, select and install the retroarch.vpk file, following the prompts that come up. This install will take quite some time, about five minutes, with some hangups along the way. This is normal. Once complete, disconnect from USB mode, then go back to the home screen. You should now see the RetroArch app there.
Run RetroArch once, and then close it out. Reconnect to your Vita using VitaShell, then on your PC navigate to data > RetroArch > system, and add your bios files there. BIOS files will not be shared on this website due to copyright, so you will need to dump them from an original console, or find backups on the internet. I recommend adding the following:
SEGA CD: bios_CD_E.bin bios_CD_J.bin bios_CD_U.bin FAMICOM DISK SYSTEM: disksys.rom GAME BOY (for boot logo): gb_bios.bin GAME BOY COLOR (for boot logo): gbc_bios.bin GAME BOY ADVANCE: gba_bios.bin NEO GEO: neogeo.zip PLAYSTATION: scph1001.bin TURBOGRAFX-CD: syscard1.pce syscard2.pce syscard3.pce
To actually run RetroArch, you will want to make a ROMs folder somewhere on your SD card. The easiest thing to do would be to just make a ROMS directory in the root directory of your microSD card, and then put all of your ROMs in subfolders within that directory. Then create playlists for each of those systems by pointing the playlist creator to the folders where you stored the ROMs.
When making a playlist for arcade games, you will want to do a manual scan and use this dat file to make sure that the zipped names (e.g. tmnt.zip) are converted to full names (Teenage Mutant Ninja Turtles). If you have questions about this part of the process, my RG350 RetroArch video (around the 13:00 mark) will show you a demonstration.
Here are my recommended RetroArch cores:
Arcade (90s and CPS): FB Alpha 2012 Arcade (Neo Geo): FB Alpha 2012 Arcade (80s): MAME 2003-Plus GB: Gambatte GBC: Gambatte GBA: gpSP NES: FCEUmm SNES: Snes9x 2005-Plus Game Gear: Genesis Plus GX Genesis: Genesis Plus GX Sega CD: Genesis Plus GX Sega 32x: Picodrive
When it comes to graphical fidelity, I recommend the following settings:
Integer Scaling: OFF Bilinear Filtering: ON Filter: Normal2x
To access filters, you will want to go into RetroArch Settings > Directory and point the Video Filters folder to the correct filters folder (found at uxo:/data/retroarch/filters). Note that filters can affect CPU performance, so if a game is not running at full speed, I recommend removing the filter. In general, FinalBurn Alpha 2012 runs best without filters, and some demanding SNES games may need the filter to be off as well.
Some notes:
- You can also use overlays to fill up the blank space on your screen for certain systems, here is a good source.
- RetroArch on the PS Vita supports RetroAchievements! Check out this video guide for more info on how they work.
- NetPlay is possible between two PS Vitas. They need to be running the same version of RetroArch, the same core, and the same game file. You will also need to use a Relay Server (I wasn't able to get local NetPlay to work in my testing). For more info, check out this guide.
Create RetroArch bubbles
You can use a tool called RetroBuilder to create bubbles for your Vita home screen. Note that this tool is only available on Windows PCs. To start, download the latest RetroBuilder .zip file, and extract it on your computer. Next, open the RetroBuilder 3.0 folder, and run the zz-RetroBuilder.bat file inside. You will see a pop-up menu. Inside that window, type "1" and ENTER to go to the Input Folder, which will pop up. Inside this folder, place three images:
bg.png - the bubble's background image icon0.png - the bubble's image startup.png - the clickable image over the background (optional)
You can use any sort of image you want. Personally, I prefer to use the boxart for my bg.png, the title screen for icon0.png, which I get from the Libretro thumbnails repository. For the startup.png, I use the system images from screenscraper.fr.
Once you have your images, rename them to the above names (it's okay if they are .jpg, the app will convert them for you) and put them in the Input Folder. Next, take the ROM from your PS Vita and place a duplicate in the same Input Folder. Once those are complete, back on the zz-RetroBuilder.bat popup menu, type "2" and ENTER. It will ask you to name the bubble (e.g. "Super Mario World") and to provide a 9-digit Title ID that is all CAPS and/or numbers (e.g. "SMW111222").
Once complete, you will find a vpk inside the RetroBuilder/VPK folder. Move that vpk onto your Vita and then install it using VitaShell. You should now see the bubble on your home screen. Note that launching a game from the bubble takes quite a bit of time, since it has to launch RetroArch in the background.
Some notes on this process:
- For best results, name your ROMs folder "ROMS", and name the system folders inside as follows: GB, GBC, GBA, NES, SNES, GG, GEN.
- My understanding is that you can only create bubbles for Nintendo and Sega games listed above — not Arcade games, TG16, etc.
- The bubbles will launch using the default core chosen by RetroBuilder, not what you have associated with your RetroArch playlist. To change the default core, check out this video from SaiyanPrinceVegeta.

Install standalone emulators and ports
There are plenty of other emulators and apps you can install on the PS Vita, and this site has a good list of emulators and ports that run on the device. To install any of these emulators, you will follow the same process as with any other VPK:
- Connect to your PC via USB using the VitaShell app
- Move the VPK over onto the root folder of your PS Vita
- Launch the file within VitaShell on your device to install it
- The app is magically on your home screen
- Celebrate with champagne and mac & cheese
You could also install the Vita HomeBrew Browser to install these apps directly onto your device. Here are some highlights:
Tools and emulators:
Moonlight HD (PC streaming)
mGBA (GBA/GB/GBC)
DaedalusX64-vitaGL (N64)
Vita Media Center (movie player)
The Vita can also play standalone PSP emulators. Check out the Adrenaline section for more info.
Ports:
DevilutionX (Diablo)
Grand Theft Auto III
GTA3: Vice City
GTA3: San Andreas
Half-Life
Max Payne
Minit
Sonic 1 and 2 ports
Sonic CD port
Note that for most of these ports, you need to provide your own commercial data files. Instructions on how to set each of these up are within the links above.
Nintendo 64 emulation
The standalone Nintendo 64 emulator is called DaedalusX64. Installing this app is just like with any other VPK.
Once installed, put the N64 game files in the data > DaedalusX64 > Roms folder of your microSD card. Boot the app once to create the folder structure, then move over your files using VitaShell. You may not have a folder named "Roms" in your Daedalus data folder, which is fine — just make one. I recommend using unzipped .n64 or .z64 files.
Once you've loaded up your games, start up the DaedalusX64 app and go to Files > Download Data Files, which will download the media (box art) for every game in the Nintendo 64 catalog and load them for the games you've added.
There are a few things you can do to improve the performance of the DaedalusX64.
- Every time you boot up the app, it will check for a new update and will also re-download the compatibility list. These only need to be done periodically, so it's better to turn them off. To do so, go to Extra > Auto Update at Boot > OFF, and Extra > Update Compat List at Boot > OFF. Be sure to also go to Extra > Save Global Settings.
- To increase the font size of the text, go to Extra > Scale UI Texts.
- If you have graphical glitches when playing a game, go to Graphics > Textures Caching and toggle between those three settings.
- In the Input > Controls Mapping there are a number of mapping configurations available depending on your play style and the game you are playing.
- If you are experiencing performance problems but really want to play a certain game, the single biggest thing you can do to improve performance is to go in and select Audio > Disabled. The Nintendo 64 didn't have a dedicated audio chip, so all audio was routed through the CPU; disabling the audio will be less taxing on the CPU altogether. For example, with audio off, you can expect about 32fps performance on Goldeneye 007 without any sort of overclocking (expect about 20fps with the audio on). That being said, audio is often considered an integral aspect of gaming, so you may not be interested in this option.
- While in the game selection menu, click the "Filter by" dropdown to filter your games by playability. That way, you can load up all of your games at once, set a "Playable" filter, and then only have the playable games listed (as determined by the community's compatibility list) in your game selection menu.
- The app will default to a 16:9 aspect ratio, which honestly looks pretty great for some games. To adjust it to 4:3, to go Graphics > Aspect Ratio > 4:3. Some games will work with the "16:9 unstretched" option, which functions as a widescreen hack, which you can see in the picture below:

Overclocking the PS Vita
The PS Vita has an ARM Cortex A9 CPU, which can be clocked up to 2GHz. However, Sony clocked their CPU to 333MHz in order to improve stability and battery life. Overclocking can potentially improve emulation performance on the PS Vita, especially with RetroArch and DaedalusX64.
Note that overclocking performance can vary by Vita (also known as "silicone lottery"). Additionally, overclocking your Vita may cause premature aging to your battery and other components. Use sparingly and at your own risk.
Using AutoPlugin II, go to Vita Plugins > Install Plugins, and choose one of the following overclocking options:
- LOLIcon – this overclock plugin will allow you to bring up a menu to overclock up to 500MHz. To bring up the plugin GUI, press SELECT + UP.
- lolita444 – this overclock is based on LOLIcon but is much simpler — it just sets your CPU clockspeed to 444MHz across the board.
- lolita500 – this is similar to lolita444 but sets the CPU clockspeed to 500MHz. This will likely cause errors with many games and apps.
- PSVshell — this plugin has three different GUI modes which can come in handy when you want to display your performance while playing. This plugin is similar to LOLIcon in that you can adjust the clockspeed up to 500MHz.
To see some of these overclocking options in motion, check out my N64 emulation video (embedded above).
Improve the PS Vita 2000 screen
The PS Vita 2000 "Slim" has a lot of improvements over the PS Vita 1000 — it is slimmer, lighter, more ergonomic, uses micro-USB to charge instead of a proprietary charger, and has longer batter life. But there is one big downside: it uses an LCD display, which is inferior to the OLED screen on the PS Vita 1000. There is one trick you can do to improve the saturation and contrast on the PS Vita 2000 so that it better mimics the OLED PS Vita display.
To start, we will need an app called RegistryEditor. Go to this GitHub releases page and download the latest RegistryEditor.vpk file. Connect the Vita to your PC via VitaShell, then press SELECT on the Vita to enter USB mode. Copy the RegistryEditor.vpk file into the root "USB Drive" folder of your Vita. Disconnect from USB mode, then scroll down to find the RegistryEditor.vpk file on your Vita; press CIRCLE to install the package and follow the prompts. Close VitaShell and you should now see the RegistryEditor app on your home screen.
Open up the RegistryEditor app, and then select CONFIG > DISPLAY and edit these two lines to change their values from "0" to "1":
color_space_mode: 1 rgb_range_mode: 1
Once you have adjusted these values, press START on your Vita to save your settings and close the app. Next, reboot your Vita and you should now have more saturated colors and higher contrast.
Permanent mod guide (old method)
Note that while this method still works, the process has been simplified thanks to the VitaDeploy method, and I recommend using that one instead.
If you are using a PS Vita 1000, you will need an official PS Vita memory card to run the jailbreak process. The PS Vita 2000 has onboard storage so you don't need a card if you own that device. You don't actually need a large card, I would get the smallest/cheapest official card you can find. eBay is probably your best resource for these, and I would expect to pay about $15 for an 8GB card.
There are several small apps and files we will use in this jailbreaking process. Create a folder on your computer named "Vita", or something memorable, like "Peanut Butter". This is where we will store all of these tools.
QCMA – this application will make your PC recognize the PS Vita when you plug it in via USB. Go to this GitHub releases page and download the Qcma_setup-0.4.1.exe file. If you are a Mac user, use the .dmg file provided in this link instead.
Enso – this is a custom firmware installer for the PS Vita. Head over to this page and download the latest VPK (v1.1 is the most recent as of this writing), and place it in your Peanut Butter folder.
Final h-encore – this tool pushes the h-encore exploit onto your PS Vita. Go to this releases page and grab the most updated version (v1.92 as of this writing), and place it in your Peanut Butter folder. If you're using a Mac, use this app instead (note that this app appears to have some issues with the latest versions of MacOS; the simplest solution has been to use a friend's Windows PC or to install a virtual machine).
0syscall6 – this tool will trick the Vita into thinking it's running firmware 3.73 when it's actually running 3.65, which is helpful when playing some Vita games. Download the regular and the "hfw" versions of the tool from this GitHub page. Put them in the Peanut Butter folder.
These files are necessary if you need to downgrade your firmware to 3.65:
Modoru 戻る– we're going to use Modoru to downgrade our 3.73 system to 3.65 in order to jailbreak the device. You can grab the latest version (v2.1) from this page. You guessed it, throw it in the Peanut Butter folder.
Complete official 3.65 firmware – we will also need the official 3.65 PS Vita firmware, which you can find here. If the file link goes down, head over to this archive page and find the Firmware 3.65 link under "Complete Old Firmwares". The MD5 hash of this file is 880db39cab42056227a2f22e867bc97f
Upgrade to 3.73 (or stay at 3.65)
On the device, go into Settings > System > System Information and see what System Software you are running. If your PS Vita has the 3.65 software version don't do anything. If you have something between 3.65 and 3.73, use the Settings > System Update function to upgrade to 3.73. You'll need to have your WiFi connected in order to update.

Set your File Explorer options
In order to see and manipulate the correct files and folders for this project, you need to make sure that you can see them in the first place. On your Windows PC, go to View > Options, then the "View" tab. Make sure the following settings are configured:
Show hidden files, folders, or drives > ON Hide empty drives > OFF Hide extensions for known file types > OFF Hide protected operating system files > OFF
You can always turn these back in the settings after we're done with the project.
If you are a Mac user, simple press CMD + SHIFT + "." (period) to unhide/hide hidden folders and files.
Prepare for jailbreak
Your device will need to be connected to WiFi. Additionally, log into the PS Store with your PSN account at least once before doing the jailbreak, otherwise you won't be able to download game updates and DLC, etc.
Go into your Peanut Butter folder and run the QCMA installer. This allows your computer to communicate with the PS Vita. After you have installed the app, run the app and keep it running throughout this tutorial.
Also in your Peanut Butter folder, extract the h-encore zip file into its own folder. Inside your h-encore folder, find the FinalHLE.exe file, and run this app. If you don't already run your PC as an Administrator, go ahead and right-click on it and select "Run as Administrator". Leave this tool open.
Downgrade to firmware version 3.65
If your device is already running firmware version 3.65, you can skip the next section.
Plug your device into your PC via USB and tap the Content Manager app and select the "Copy Content" option. This should connect you to your PC.
On your Final h-encore window, you should see that the app has detected your 3.73 PS Via. Click on the "Trim h-encore to ~7MB" option and then press the "Let's GO!" button. Do not close this window after it's finished the process.
Back on the PS Vita, select Copy Content > "PC to PS Vita System" > Applications > PS Vita > h-encore > Copy, then confirm the copy process. Once it is done, exit out of the Content Manager app and back to the home screen. You should now see the h-encore app appear. Click on the h-encore app to start it up, and it will bring you to a text menu. Scroll down to "Install HENkaku" and press the CIRCLE button to confirm, and then do the same for the "Download VitaShell" option below it (you will need to be connected to WiFi). Once you're done with those two processes, go ahead and select "Exit" to return to the home screen. You should now see the VitaShell app on your home screen.
If you are having issues opening h-encore, or it opens to a white screen, this is a common problem. The developer indicates that simply trying a few times should resolve the issue. Another trick is to make sure that both bluetooth and WiFi are turned on, and then hold the R button when booting h-encore.
Go to your PS Vita settings application, and verify that you can see the HENkaku Settings between the "Flight Mode" and "Network" option menus. Go into the HENkaku settings and verify that the "Enable Unsafe Homebrew" setting is checked. Okay, now we're ready for the actual modding process.
Open up the VitaShell app on your Vita, which is a robust file management app. Once the app is open, press the SELECT button on your Vita to turn on the USB connection. A window should pop up on your PC, and the Vita will be recognized as a "USB Drive".
First thing, copy over the Modoru VPK that we downloaded earlier, directly into the root "USB Drive" folder. On your Vita, disconnect the USB connection, scroll down to the modoru.vpk file (navigate to the ux0 folder if you aren't already there), and press the CIRCLE button to install the package. Exit out of VitaShell and you should see the Modoru app on your home screen. Open up the app, which will automatically make a folder on your PS Vita for you. Go ahead and close the Modoru app and go back into the VitaShell app; press SELECT to turn on the USB connection again.
On your PC, in the "USB Drive" Vita folder, you should see a hidden folder named "app" — if you don't see it, make sure that you have Hidden Files turned on in your Windows File Explorer. Inside the "app" folder will be a new folder named "MODORU000". Inside that folder, we're going to add the official 3.65 firmware. Find the "PSVita OFW 3.65 complete.zip" file within your Peanut Butter folder, and then open it with WinRAR or 7Zip. Inside you should see a file named "PSVita OFW 3.65.zip", and it should be about 133MB. Extract that file onto your PC, and then within *that* folder will be a file named "PSP2UPDAT.PUP" — copy this file into the "MODORU000" folder.
Go ahead and close your VitaShell connection and close the app. Go back into the Modoru app on your Vita. If you get an error that says "Disable all your plugins first before using this software…", just reboot your Vita, open up the h-encore app one time and then exit out of it. If h-encore crashes on you when you try and open it, that's fine and normal — just keep trying until it works. Once it works, open up the Modoru app.
Within Modoru, it should say "Do you want to downgrade from firmware 3.73 to firmware 3.65?" — press the X button to confirm. It'll show you some scary text absolving the team of liability, and then it will ask you to press X again to start the installation. Let the application do its thing, don't touch or reboot the Vita at all. If you have a memory card inside it will ask you if you want to transfer anything over, just select "No".
Once complete, go into the Vita settings app and verify that you are running firmware 3.65 by going into System > System Information. At this point, go back to your home screen and delete the h-encore, VitaShell, and Modoru apps from your system (press and hold the app and select "Delete").
Now that you are running firmware 3.65, the system will prompt you to update periodically, which is something you do not want to do. To remove this prompt, go into Settings > Network > WiFi Settings and connect to your WiFi network if you haven't already. Click on your network > Advanced Settings > DNS Settings > Manual. Then under Primary DNS, type in 212.47.229.76. Press "OK" and back out of the Network Settings. Finally, go into the HENkaku Settings and and make sure that "Enable Version Spoofing" is checked, and under "Spoofed Version" set it to 3.73. Now reset your device to make sure the settings stick, and you're ready to jailbreak.
Jailbreak your PS Vita
On your Vita, open the Content Manager > Copy Content option, then plug your Vita into the PC via USB if you haven't already. If you aren't able to connect to the PC, close the Final h-encore tool on your PC and re-open it (remember to "run as Administrator"). In the Final h-encore app it should now display "Connected to PS Vita @3.65". Make sure that the "Trim h-encore to ~7MB" option is checked, then select "Let's GO!" to re-install h-encore to your Vita.
Once Final h-encore is installed on your device, go back to your PS Vita and select Copy Content > "PC to PS Vita System" > Applications > PS Vita, then select the h-encore checkbox and select "Copy" and click "Ok" at the prompt. Once it is done, exit out of the Content Manager app and back to the home screen. You should now see the h-encore app appear. If you get a "failed to unpack" error, just repeat these steps again until you are successful.
If you are having issues opening h-encore, or it opens to a white screen, this is a common problem. The developer indicates that simply trying a few times should resolve the issue. Another trick is to make sure that both bluetooth and WiFi are turned on, and then hold the R button when booting h-encore.
Within h-encore, select "Install HENkaku" and then also "Download VitaShell". Once complete, exit h-encore and return to the home screen.
Note: If you receive an error that says "Failed! 0x80431075" when you try and install VitaShell within Final h-encore, follow the steps in this guide to manually install VitaShell. This happened to me on my PS Vita 2000, but not my PS Vita 1000.
Back on the home screen, you should now see VitaShell, go ahead and open it. Press the SELECT button to enter USB mode, and return to your PC, where the Vita will appear as a "USB Drive". In this root USB Drive folder, copy over the enso.vpk file from your Peanut Butter folder. Inside the USB Drive folder you should see a hidden folder named "tai" — inside this folder, copy over the 0syscall6.skprx and 0syscall6_hfw.skprx files. At this point you can disconnect your USB connection and unplug the Vita from your PC.
Within VitaShell, go into the "ux0" folder, then find the enso.vpk file. Press the CIRCLE button to select and install the application, and confirm any prompts that pop up. Once complete, go ahead and close out of VitaShell and you should see the Enso app appear on your home screen. Open up Enso ("Molecule"), and you will see some tiny text advising you that this is a permanent mode. Press the CIRCLE button to confirm the terms, and then press X to run the installation. Once complete, press any key to reboot.
You will know that the process is complete once you see the Enso/Molecule logo instead of the PS Vita logo when booting the device. To verify, go into Settings on a fresh reboot and you should already see HENkaku settings as an option in the menu. Go into the System > System Information settings and you should see that the System Software version now shows 3.65.
Restore PlayStation Store access
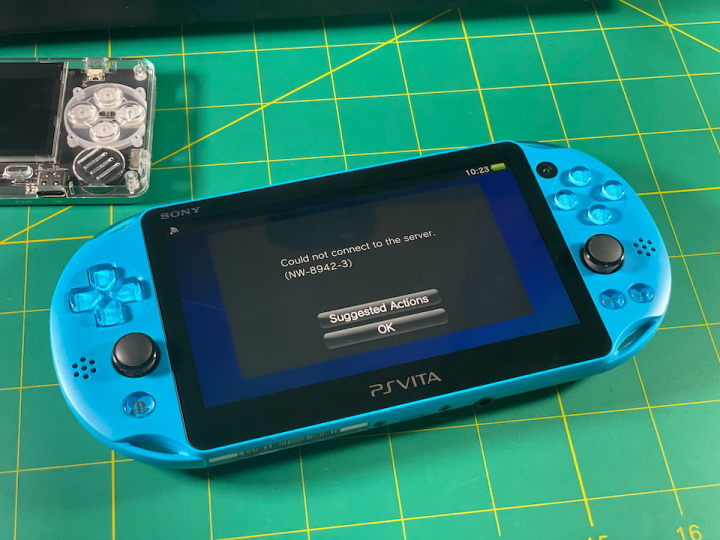
A recent update to the PlayStation Store has removed access for those with jailbroken devices, which makes it impossible to go onto the PS Store and purchase or download your previously-purchased content. The error code you will get will say "Could not connect to the server (NW-8942-3)" or something along those lines. Luckily, restoring your access is very simple. If you used the VitaDeploy hacking method above, you can install iTLS Enso directly onto your device, which will fix it. But if you used the older hacked Vita method, here are the steps:
Head over to this page and download the latest version of iTLS Enso. Place the VPK on your device using VitaShell, then install it like any other VPK. Once installed, it will show up on your home page — start it up and install the following two packages:
Install the iTLS plugin Install the iTLS http & ssl modules (in-app)
With each installation, your PS Vita will reboot. And that's it, you should now be able to access the PS Store again.
SD2Vita Guide (YAMT method)
Note that this guide is not required if you haven't hacked your Vita yet. Instead, just follow the VitaDeploy hacking method, which will also set up the SD2Vita at the same time.
If your device was hacked using the older (non-VitaDeploy) method, let's set it up so that you can use a common microSD card to store everything. To start, you will need to purchase the Funturbo SD2Vita card adapter. It's the best $6 you could ever spend. I've heard bad things about other SD2Vita adapters, so I would stick with the Funturbo brand — I have two and they have worked perfectly.
I think that a 128GB card should be the bare minimum size you buy, and I recommend getting something with 256GB. PS Vita, PSP, and PS1 games are all fairly large, so this will ensure you can load up lots of games. Here are the microSD cards I recommend:
128GB cards: SanDisk Extreme Samsung EVO Select Samsung Pro Endurance (more reliable but pricey) SanDisk Ultra 256GB cards: Samsung EVO Select SanDisk Ultra
The YAMT method is my preferred way to set up an SD card as your PS Vita's storage solution. This method is simple, and also formats the card in TexFAT file system, which is what is used on the original Sony PS Vita Memory Cards. What this means is that you will have much faster boot times, and a super stable file system. This file system is also readable on Windows PCs, which means you can just pop the card into your PC if you want to transfer over large files. Unfortunately, you won't be able to read your card on a Mac, but you can always use VitaShell to transfer files over via USB.
To get started, download the YAMT vpk from this GitHub page and transfer it to your device via VitaShell. Within VitaShell, select and install the app onto your device. Exit VitaShell and then open the YAMT app that should now be on your home screen. Select "Install the lite version"; after the installation, your device will reboot. Now in your Settings > Devices directory you should see a "Storage Devices" section. Inside, adjust the settings to as follows:
Use YAMT: YES ux0: Memory Card (PS1000) or Internal Storage (PS2000) uma0: SD2Vita
Insert your SD2Vita card (with a microSD card inside) into the device, then select Developer Options > "TexFAT format GC-SD's storage". The screen will pause for a moment, and then you're good. Exit the Settings, reboot your device, then head over to VitaShell. There you should see that ux0 reflects the size of your internal memory (on a Vita 2000 model) or your memory card (Vita 1000 model), and uma0 should reflect the size of your microSD card.
Go into the ux0 folder and scroll down to hover over one of the folders (not the folder annotated as ".."), then press the TRIANGLE button. Select "Mark All", then press TRIANGLE again and select "Copy". You will get a notification that your folders have been copied. Go into the uma0 folder, press TRIANGLE, and then select "Paste". This will copy all of your system files to the SD card.
Once the files have transferred, exit VitaShell and return to the Settings > Devices > Storage Devices and change the values to as follows:
Use YAMT: YES ux0: SD2Vita uma0: Memory Card (PS1000) or Internal Storage (PS2000)
This will now set the microSD card to be your system's primary storage. Reboot your device, then verify in VitaShell that the ux0 reflects the size of your SD card. While still in VitaShell, press START to bring up the settings menu, and set the "USB device" option to "sd2vita". Now, whenever you connect your PS Vita to your PC via VitaShell, it will bring up the SD card directory, and not your internal memory or memory card.
Now you're ready to start installing apps and games. May I suggest starting with the Vita Homebrew Browser?


How to migrate from Storage Manager plugin to YAMT:
If you had previously set up your device for Storage Manager but want to take advantage of YAMT's upgraded boot speed and stability, follow these steps:
Go into AutoPlugin II and select Vita Plugins > Configure plugin for SD2VITA. Change the settings to reflect as follows:
PS Vita 1000 settings: MCD = ux0 (LiveArea Applications) INT = none (unmounted) GCD = none (unmounted) UMA = none (unmounted) PS Vita 2000 settings: MCD = none (unmounted) INT = ux0 (LiveArea Applications) GCD = none (unmounted) UMA = none (unmounted)
Press TRIANGLE to save current configuration. You will be prompted to restart your PS Vita. After the reboot, you may still see all of your apps, but you won't be able to open them, and will get a "this file is corrupted error" if you try. That's perfectly fine. Shut down your device, then remove the SD2Vita adapter.
If you plan on using the same card for the YAMT method, put the microSD card into your computer, and copy over all of its contents into a folder on your computer for safe keeping. If you plan on using a different card, you can skip this step.
Insert the old SD card (if you plan on using the same card) or new card into the adapter, then insert the adapter into your device. Turn on your device, then connect to your computer using VitaShell. Copy over the YAMT.vpk and the follow the steps above to set up the device.
Instead of moving files over from the internal storage or memory card like in the tutorial above, we're going to copy files over from your old SD card. Once you have formatted the card using TexFAT, shut off your device and remove the SD card, then place it in your computer. Copy over the contents that you saved onto your computer in the previous steps, or copy over the contents of your old card if you are using a new SD card. This may take a long time depending on how much stuff you have on your card. Note that this method only works for PC, since TexFAT is not readable by Macs. If you are using a Mac, you'll have to transfer everything from your Mac or old SD card to the new card via VitaShell, which will take quite some time.
Once you have moved over your contents to the TexFAT card, you can complete the rest of the tutorial above: set up the ux0 as the SD2Vita, and the Memory Card or Internal Storage as the uma0. Reboot and you should now be good to go. It will rebuild your libraries upon that first boot, which can take a minute or two. If it doesn't trigger the library update, you can do that within VitaShell by pressing the TRIANGLE button and selecting the "Refresh LiveArea" option. Finally, go into AutoPlugin II > Vita Plugins > Uninstall plugins > ur0:tai/storagemgr.skprx to remove the Storage Manager plugin.
SD2Vita Guide (Storage Manager method)
The Storage Manager method is not my preferred method, but it is a common way of setting up the SD2Vita card, and so for posterity's sake, here are the instructions. Your device will already need to be hacked for this to work. To get started, download and unzip this zzBlank.img file. If your SD card is not blank, I recommend formatting it using the official sdcard.org formatter. Flash the zzBlank.img file onto a blank microSD card using an app like Balena Etcher, Win32 Disk Imager, or Rufus. If you are a Mac user, use Balena Etcher. This process is simple: open whatever flashing tool you want to use, navigate to the zzBlank.img file on your computer, and select the SD card you have inserted into your PC, and then start the flashing process.
Once it's been flashed, eject and re-insert the SD card. Windows will prompt you to reformat your SD card, and yep, we're going to do it. Set the File system to exFAT, and the Allocation Unit Size to default, and name it whatever you want in the Volume Label section. Keep the SD card in your PC, and let's connect our Vita to the PC so we can transfer system files to the SD card.
Connect the Vita to your PC via VitaShell, then press SELECT on the Vita to enter USB mode. On your PC, the Vita's root folder should appear as a "USB Drive". Make sure that you have all hidden files and folders visible for this step (see: Set your File Explorer options for more info). Now, copy all of the folders and files from your Vita's USB Drive onto the blank SD card. If you have any prompts to replace any files in the destination, select YES. At this point you can disconnect your PS Vita from the PC, and eject the SD card from your PC as well.
Put the SD card into your SD2Vita adapter, and then insert the adapter into your Vita. Open the AutoPlugin II app then go to Plugins for Vita > Install Plugin for SD2Vita. Follow the prompts to install the plugin. On the next screen it will show you a list of devices and their mount point — this will allow you to configure how each storage location behaves. You want to make sure the following options are set:
PS Vita 1000 settings: MCD = uma0 (USB Port) INT = none (unmounted) GCD = ux0 (LiveArea Applications) UMA = none (unmounted) PS Vita 2000 settings: MCD = none (unmounted) INT = uma0 (USB Port) GCD = ux0 (LiveArea Applications) UMA = none (unmounted)
Once these configurations are locked, press the TRIANGLE button to save the changes, and it will restart the system. To verify everything is working properly, open up VitaShell and verify that the size of ux0 matches your SD card size.
While in VitaShell, press START to bring up the settings menu, and set the "USB device" option to "sd2vita". Now, whenever you connect your PS Vita to your PC via VitaShell, it will bring up the SD card directory, and not your internal memory or memory card.
Changelog
07AUG2021
– added written VitaDeploy guide
– reorganized guide to emphasize VitaDeploy as preferred method
19JUL2021
– added h-encore troubleshooting suggestions
10JUL2021
– added N64 video
– added Restore PlayStation Store access section
09JUL2021
– added Nintendo 64 emulation section
– added overclocking section
13JUN2021
– added link to RetroArch video
– updated RetroArch guide
– added Vita Media Player link
– added NetPlay information
12JUN2021
– added more RetroArch info and the RetroArch bubbles guide
31MAY2021
– updated wording based on feedback from romadu
16MAY2021
– added tip about resetting device after downgrading to make sure settings stick
15MAY2021
– added Adrenaline Bubble Manager
– added recommended Adrenaline settings
12MAY2021
– added WiFi FTP instructions
01MAY2021
– added SD2Vita (YAMT method) instructions and video
– added migration instructions from Storage Manager to YAMT for existing SD2Vita users
27APR2021
– published guide
– added HENkaku version spoofing instructions
– added PSN login instructions
how to install adrenaline ps vita
Source: https://retrogamecorps.com/2021/04/27/ps-vita-guide/
Posted by: ferrellanown1990.blogspot.com
0 Response to "how to install adrenaline ps vita"
Post a Comment